
Practice Test #2
Simulate the real exam experience with 50 questions and a 100-minute time limit. Practice with AI-verified answers and detailed explanations.
AI-Powered
Triple AI-Verified Answers & Explanations
GPT Pro, Claude Opus, and Gemini Pro cross-check every answer and explanation. See the reasoning for each option, requirement breakdowns, and solution architectures.
Practice Questions
Which two of the following actions are required to successfully update Storage Center OS using the Storage Center Update Utility? (Choose two.)
Not required. Storage Center Update Utility usage is generally not gated by a simple “enable utility” checkbox in Storage Center settings. While some products have feature toggles, SCOS update workflows typically rely on correct connectivity, credentials, and validated upgrade paths rather than a GUI checkbox. This option is a plausible distractor because “enable feature” steps are common in admin tools.
Required. A SCOS pre-upgrade check validates system health, compatibility, and prerequisites before applying the update. Using SupportAssist (or the support workflow it enables) is commonly part of ensuring the upgrade path is supported and that known issues are identified early. This reduces failed upgrades and aligns with best practices for controlled change management.
Required. Live Volume replication can be sensitive during controller/OS updates because replication sessions may drop, resync, or trigger failover behaviors. Pausing replication prior to the update helps maintain data consistency and prevents replication-related conflicts or heavy resynchronization after the upgrade. This is a typical prerequisite in storage upgrade runbooks.
Not required and generally incorrect. Disabling SupportAssist would not normally be needed for the update utility to communicate with the Storage Center; if anything, SupportAssist improves supportability and diagnostics. Communication issues are usually solved by network/proxy/firewall configuration, correct ports, and credentials—not by disabling support tooling.
Not required. Applying a special license to use the Storage Center Update Utility is not typically a prerequisite for SCOS updates. Licensing may apply to advanced features (replication, Live Volume, etc.), but the ability to update the system software is generally part of standard platform maintenance and support entitlement, not an add-on license.
Question Analysis
Core concept: This question is about safely performing a platform update using a vendor update utility (Storage Center Update Utility for Dell EMC SC Series/SCOS). Even though it’s labeled as SC-200, it’s not an Azure/Microsoft Sentinel scenario; it’s an infrastructure operations question focused on change management, pre-upgrade validation, and replication/availability considerations. Why the answer is correct: B is required because a SCOS pre-upgrade check is a standard prerequisite to validate readiness (health, firmware compatibility, configuration state, and known blockers) before applying an OS update. In many environments this is initiated/validated through SupportAssist (or equivalent support channel tooling) so Dell can confirm the upgrade path and identify issues that would cause the update to fail or risk data availability. C is required because Live Volume replications introduce additional state and coordination across systems. During an SCOS update, replication links and Live Volume relationships can be impacted (planned failover behavior, link interruptions, or resync requirements). Pausing/suspending replication is a common required step to prevent replication conflicts, reduce risk of split-brain conditions, and ensure the update process can proceed without replication-related locks or resynchronization storms. Key features / best practices: Pre-upgrade checks align with operational excellence and reliability principles (similar to the Azure Well-Architected Framework): validate prerequisites, reduce blast radius, and ensure rollback planning. Replication pause aligns with reliability: protect data consistency and avoid unintended failovers/resync. Common misconceptions: Options A, D, and E sound like “enablement” steps, but the update utility typically doesn’t require a special checkbox, disabling SupportAssist, or an extra license just to perform an OS update. Disabling SupportAssist would usually reduce supportability rather than help. Exam tips: For update/upgrade questions, look for two recurring requirements: (1) pre-check/health validation and (2) actions that stabilize data movement/replication (pause/suspend) to maintain consistency. If an option suggests disabling support tooling, it’s usually a red flag unless explicitly required by documented network/proxy constraints.
You have an existing Azure logic app that is used to block Azure Active Directory (Azure AD) users. The logic app is triggered manually. You deploy Azure Sentinel. You need to use the existing logic app as a playbook in Azure Sentinel. What should you do first?
A scheduled query rule (analytics rule) creates alerts/incidents from log queries. While analytics rules can be paired with automation rules to run playbooks, this does not address the core blocker: the Logic App is manually triggered and not yet compatible as a Sentinel playbook trigger. You would typically create/adjust detections after the playbook is usable, not as the first step to convert it.
A data connector is used to ingest data sources into Microsoft Sentinel (for example, Entra ID, Microsoft 365 Defender, or Azure Activity). Data ingestion is important for detections and investigations, but it does not change how a Logic App is triggered. Adding a connector won’t make a manually triggered Logic App callable as a Sentinel playbook.
Threat Intelligence connectors are for ingesting TI indicators (STIX/TAXII, platforms, etc.) into Sentinel for correlation and detection. They are unrelated to incident response automation and do not affect whether an existing Logic App can be used as a playbook. This option confuses threat intel ingestion with SOAR execution requirements.
To use a Logic App as a Sentinel playbook, it must have a Sentinel-supported trigger (commonly the Microsoft Sentinel incident trigger) so Sentinel can invoke it and pass incident context. Since the existing Logic App is manually triggered, the first required action is to modify the trigger accordingly. After that, you can attach it via automation rules or run it from incidents.
Question Analysis
Core concept: Microsoft Sentinel playbooks are Azure Logic Apps that are invoked by Sentinel (typically from an automation rule, incident, or alert). For Sentinel to call a Logic App as a playbook, the Logic App must use a Sentinel-supported trigger (for example, the Microsoft Sentinel incident trigger) rather than a purely manual trigger. Why the answer is correct: Your existing Logic App is triggered manually. A manually triggered Logic App cannot be executed automatically by Sentinel as a playbook because Sentinel needs a trigger endpoint it can invoke in the expected way (incident/alert entity context, or a supported request trigger pattern). Therefore, the first step is to modify the Logic App trigger to a Sentinel playbook trigger (commonly “When a response to a Microsoft Sentinel incident is triggered” / incident trigger). After that, you can attach it to incidents via Automation rules or run it manually from an incident. Key features and best practices: - Playbooks are used for incident response automation (SOAR) in Sentinel and are typically executed from Automation rules. - The Logic App must be in the same tenant and have appropriate permissions (managed identity or connections) to perform actions like blocking an Entra ID (Azure AD) user. - Follow Azure Well-Architected Framework (Security and Reliability): least privilege for Graph/Entra actions, audit logging, and idempotent design (avoid blocking the same user repeatedly without checks). Common misconceptions: - Creating analytics rules (scheduled query rules) is for detection, not for making an existing Logic App eligible as a playbook. - Data connectors ingest data; they don’t convert a manual Logic App into a Sentinel playbook. - Threat Intelligence connectors are unrelated to executing response automation. Exam tips: If a question asks how to “use an existing Logic App as a Sentinel playbook,” check the trigger type first. Sentinel playbooks require Sentinel-compatible triggers so Sentinel can pass incident/alert context and invoke the workflow. Detection configuration (analytics rules) and ingestion (data connectors) are separate steps from SOAR enablement.
Note: This question is part of a series of questions that present the same scenario. Each question in the series contains a unique solution that might meet the stated goals. Some question sets might have more than one correct solution, while others might not have a correct solution. After you answer a question in this section, you will NOT be able to return to it. As a result, these questions will not appear in the review screen. You use Azure Security Center. You receive a security alert in Security Center. You need to view recommendations to resolve the alert in Security Center. Solution: From Security alerts, you select the alert, select Take Action, and then expand the Mitigate the threat section. Does this meet the goal?
This option is correct because Azure Security Center allows you to open a security alert and use the Take Action area to review recommended remediation steps. The Mitigate the threat section is specifically intended to provide guidance on how to respond to and reduce the impact of the detected threat. Since the goal is to view recommendations to resolve the alert, this navigation path directly satisfies the requirement. It is an alert-centric workflow rather than a general security posture view, which makes it the right choice.
This option is incorrect because the described solution does in fact meet the goal. In Azure Security Center, selecting a security alert and then reviewing the Take Action and Mitigate the threat sections is a valid way to see remediation guidance. Saying "No" would imply that this path does not provide recommendations, which is not true. The platform is designed to surface alert-specific mitigation steps in exactly this location.
Question Analysis
Core concept: This question tests your knowledge of how Azure Security Center (now part of Microsoft Defender for Cloud) presents remediation guidance for security alerts. Specifically, it checks whether you know where to find the recommended actions associated with an alert so you can investigate and mitigate the detected threat. Why the answer is correct: In Azure Security Center, when you open a security alert, the Take Action area provides response guidance for that alert. Expanding the Mitigate the threat section shows recommendations and remediation steps that help address the issue identified by Security Center. This is the correct workflow for viewing alert-specific recommendations, so the proposed solution meets the stated goal. Key features / configurations: - Security alerts provide incident details, affected resources, severity, and detection context. - The Take Action pane is designed to guide responders through investigation and remediation. - The Mitigate the threat section contains recommended steps to reduce risk and remediate the detected issue. - Azure Security Center / Microsoft Defender for Cloud surfaces both posture recommendations and alert-specific response guidance. Common misconceptions: - Candidates often confuse general Secure Score or security recommendations with alert-specific mitigation guidance. - Some assume recommendations are only available from the Recommendations blade, but alert remediation guidance can also be accessed directly from the alert. - Others think Security Center only reports alerts and does not provide response actions, which is incorrect. Exam tips: - For alert remediation steps, start from the specific security alert rather than the general recommendations page. - Look for action-oriented sections such as Take Action or Mitigate the threat. - Distinguish between posture improvement recommendations and incident/alert response guidance. - In Azure exam questions, wording like "resolve the alert" usually points to alert-specific mitigation guidance.
You have the following advanced hunting query in Microsoft 365 Defender.
DeviceProcessEvents
| where Timestamp > ago (24h)
and InitiatingProcessFileName =~ 'runsll32.exe'
and InitiatingProcessCommandLine !contains " " and InitiatingProcessCommandLine != ""
and FileName in~ ('schtasks.exe')
and ProcessCommandLine has 'Change' and ProcessCommandLine has 'SystemRestore'
and ProcessCommandLine has 'disable'
| project Timestamp, AccountName, ProcessCommandLine
You need to receive an alert when any process disables System Restore on a device managed by Microsoft Defender during the last 24 hours. Which two actions should you perform? Each correct answer presents part of the solution. NOTE: Each correct selection is worth one point.
Correct. To generate an alert from an Advanced Hunting query, you must create a Custom detection rule in Microsoft 365 Defender. The rule schedules the query to run (with a lookback window such as 24 hours), and when results are returned it creates an alert (and optionally an incident). Hunting alone is not alerting; detections operationalize the query.
Incorrect. Suppression rules are used to mute or suppress alerts that are already being generated (for example, known benign activity) to reduce noise. They do not convert a hunting query into an alerting mechanism and won’t help you start receiving alerts for this behavior.
Incorrect. Adding an order by clause only affects how results are displayed in the hunting results grid. It does not change whether an alert is generated. Alerting depends on creating a detection rule and meeting the platform requirements for entity mapping, not on result ordering.
Incorrect. DeviceNetworkEvents captures network connections and related telemetry. This scenario is about a process disabling System Restore via schtasks/rundll32 behavior, which is captured in DeviceProcessEvents. Replacing the table would likely miss the activity and break the detection logic.
Correct. Custom detections need stable identifiers to create actionable alerts and link back to the exact event and device. Including DeviceId and ReportId in the projected output enables Microsoft 365 Defender to associate the detection hit with the correct endpoint and event record, improving alert fidelity and investigation pivots.
Question Analysis
Core concept: This question tests Microsoft 365 Defender Advanced Hunting (KQL) and how to operationalize a hunting query into an alert using Custom detection rules. Hunting queries are retrospective; to generate alerts you must convert the logic into a scheduled detection rule that runs continuously and creates alerts/incidents. Why the answer is correct: To receive an alert when the query matches (i.e., a process disables System Restore), you must create a custom detection rule based on the query (A). Additionally, Microsoft 365 Defender custom detections require specific identifiers in the query output so the platform can map results to the correct device/event and create an alert with proper entity context. For DeviceProcessEvents-based detections, you should include DeviceId and ReportId in the projected output (E). DeviceId ties the hit to a specific endpoint; ReportId uniquely identifies the underlying event record, enabling alert enrichment, investigation pivoting, and deduplication. Key features and best practices: Custom detection rules let you define schedule (frequency/lookback), severity, category (e.g., Persistence/Defense evasion), and automated actions (e.g., create incident). Align with Azure Well-Architected Framework “Security” pillar: ensure detections are actionable (include entity identifiers), minimize false positives (tighten conditions), and support investigation (project relevant fields like DeviceName, InitiatingProcess*, FolderPath, SHA1/SHA256 when needed). Common misconceptions: Adding sorting (C) does not create alerts; it only changes display order. A suppression rule (B) reduces alert noise after alerts already exist; it does not create alerts from hunting. Switching to DeviceNetworkEvents (D) is incorrect because the behavior is process execution (schtasks/rundll32) rather than network telemetry. Exam tips: For SC-200, remember: Advanced Hunting is for querying; alerting requires Custom detection rules. When building detections, include the required identifiers (commonly DeviceId and ReportId for device tables) and project the entities you want surfaced in the alert. Also ensure the query time filter aligns with the rule’s lookback window to avoid gaps or duplicates.
HOTSPOT - You need to create an advanced hunting query to investigate the executive team issue. How should you complete the query? To answer, select the appropriate options in the answer area. NOTE: Each correct selection is worth one point. Hot Area:
DeviceFileEvents is the correct table because the query groups by FolderPath, FileName, and ActionType—fields that are characteristic of file system telemetry in Microsoft Defender for Endpoint Advanced Hunting. DeviceFileEvents captures events such as file created, modified, deleted, renamed, and other file operations, and it can include the associated user/account context (for example, AccountDisplayName or initiating account fields depending on schema/version). Why the others are wrong: - CloudAppEvents is focused on cloud application activity (for example, Microsoft 365, OAuth apps, cloud storage actions) and would not typically use FolderPath/FileName in the same endpoint file-system sense. - DeviceProcessEvents is for process execution telemetry (process creation, command line, parent/child relationships). While it can be used to find processes that created files by joining tables, it is not the primary table when the query is directly summarizing file paths and file names.
| summarize activityCount = ______ by FolderPath, FileName, ActionType, AccountDisplayName
count() is the correct aggregation function because the query is calculating activityCount as the number of matching events (rows) for each grouping of FolderPath, FileName, ActionType, and AccountDisplayName. In KQL, summarize count() is the standard way to quantify how frequently something occurred, which is essential for hunting (for example, spotting unusually high file deletion counts by an executive account or a specific sensitive folder). Why the others are wrong: - avg() computes an average of a numeric expression/column; it does not represent “number of events” and would be meaningless unless you had a numeric metric to average. - sum() adds numeric values from a specified column/expression. Without a numeric field representing per-event quantity, sum() is not appropriate for counting occurrences. Even if you created a constant 1 column, count() is still the clearer, expected exam answer for event frequency.
Keep your exam routine moving
Get timed mock exams, AI explanations, focused review, and learning insights.
You plan to create a custom Azure Sentinel query that will provide a visual representation of the security alerts generated by Azure Security Center. You need to create a query that will be used to display a bar graph. What should you include in the query?
extend in KQL is used to add or compute new columns (for example, extend SeverityRank = case(Severity == "High", 3, ...)). While helpful for enriching data before aggregation, extend alone does not group rows or produce totals. A bar chart needs aggregated numeric values per category, so extend is not the key requirement for creating the bar graph output.
bin groups continuous values into buckets, most commonly TimeGenerated into intervals (for example, bin(TimeGenerated, 1h)). This is frequently used for time series charts, but bin by itself does not create a count of records. You still need summarize count() by bin(...) to produce the numeric values that a bar chart can plot.
count is the aggregation function typically used with summarize to return the number of records per group (for example, summarize count() by AlertName or by Severity). This produces the measure required for a bar graph (bar height). In Sentinel Workbooks and query visualizations, aggregated results like count() are the standard way to visualize alert volumes.
workspace is used in cross-workspace queries to reference tables in another Log Analytics workspace (for example, workspace("<workspace-id>").SecurityAlert). It helps with data scope, not visualization. Even if you query multiple workspaces, you still need summarize count() (or another aggregation) to generate chartable results.
Question Analysis
Core concept: This question tests Microsoft Sentinel (Azure Sentinel) Kusto Query Language (KQL) fundamentals for building visualizations in Workbooks or Analytics query results. To render a bar chart of security alerts (for example, alerts ingested from Microsoft Defender for Cloud/Azure Security Center into the SecurityAlert table), the query must return aggregated numeric values per category (such as alert name, severity, or time bucket). Why the answer is correct: A bar graph requires a measure (a numeric value) and a dimension (a grouping field). In KQL, the most common way to produce the measure “number of alerts” is to use summarize with count(). Example pattern: SecurityAlert | where ProductName == "Azure Security Center" | summarize AlertCount = count() by AlertName. The count() aggregation is what produces the numeric series that the visualization engine can plot as bar heights. Without an aggregation like count(), the query returns raw rows, which cannot be directly represented as a bar chart of totals. Key features and best practices: - Use summarize count() by <dimension> to create chart-friendly output. - Optionally combine with bin(TimeGenerated, 1h/1d) when the x-axis is time. - Filter early (where) to reduce data scanned and improve performance/cost (Log Analytics charges are tied to ingestion and query execution patterns). - Ensure the query returns a small, aggregated dataset for Workbooks/dashboards (Azure Well-Architected Framework: Performance Efficiency and Cost Optimization). Common misconceptions: - bin is often associated with charts, but it only buckets values (typically time) and still requires an aggregation (like count()) to produce a numeric value per bucket. - extend adds calculated columns but does not aggregate; it won’t create the totals needed for bars. - workspace is used for cross-workspace queries (workspace("id").Table) and is unrelated to producing chart-ready aggregations. Exam tips: For Sentinel visualizations, remember: charts need summarize. If the question mentions “bar graph,” “pie chart,” or “timechart,” look for summarize with an aggregation (count(), dcount(), sum(), avg()) and optionally bin() for time-based grouping. In SC-200, SecurityAlert and SecurityIncident are common tables; Defender for Cloud alerts typically appear in SecurityAlert with relevant product/provider fields.
You need to visualize Azure Sentinel data and enrich the data by using third-party data sources to identify indicators of compromise (IoC). What should you use?
Sentinel notebooks (Jupyter-based) are purpose-built for interactive threat hunting and investigation. They combine KQL queries with Python to visualize results and enrich data using third-party sources (threat intel feeds, REST APIs, WHOIS/GeoIP, etc.). This makes them ideal for identifying and validating IoCs through enrichment and advanced visual analytics.
Microsoft Cloud App Security (now Microsoft Defender for Cloud Apps) focuses on SaaS application discovery, governance, and session/app controls. While it can generate alerts and integrate with Sentinel, it is not the primary tool to visualize Sentinel log data and enrich it with arbitrary third-party data sources for IoC investigation.
Azure Monitor provides the underlying logging, metrics, and Log Analytics workspace that Sentinel uses. However, Azure Monitor alone is not the Sentinel investigation experience for security-specific visualization and enrichment workflows. The question specifically targets Sentinel-centric visualization plus third-party enrichment, which aligns better with notebooks.
Hunting queries in Sentinel use KQL to proactively search and correlate data in Sentinel tables. They are excellent for detection logic and hypothesis-driven searching, but they don’t inherently provide rich visualization and external enrichment workflows. For third-party enrichment and advanced visual analysis, notebooks are the better fit.
Question Analysis
Core concept: This question tests how to visualize Microsoft Sentinel data and enrich it with third-party data sources to identify indicators of compromise (IoCs). In Sentinel, this is commonly done using Notebooks (built on Azure Monitor Logs/Log Analytics and Jupyter), which support interactive investigation, visualization, and enrichment via external APIs and threat intel sources. Why the answer is correct: Notebooks in Microsoft Sentinel are designed for advanced hunting and investigation workflows that go beyond static KQL results. They allow analysts to pull Sentinel tables (via KQL), then enrich the results with third-party intelligence (for example, VirusTotal, AbuseIPDB, WHOIS, GeoIP, MISP, or custom REST APIs), and finally visualize relationships and timelines using Python libraries (pandas, matplotlib, plotly) or built-in notebook visualizations. This directly matches the requirement: “visualize Sentinel data” and “enrich the data by using third-party data sources to identify IoC.” Key features / best practices: - Interactive investigation: Combine KQL queries with Python for iterative analysis. - Data enrichment: Call external services securely (ideally using Azure Key Vault-backed secrets, managed identity where supported, and network controls). - Visualization: Create charts, maps, and entity relationship views to spot patterns and validate IoCs. - Reusability: Save notebooks as playbooks/runbooks for repeatable investigations and team standardization. From an Azure Well-Architected perspective, notebooks support Operational Excellence (repeatable investigations), Security (controlled access to secrets/APIs), and Performance Efficiency (targeted enrichment rather than enriching all data at ingestion). Common misconceptions: Hunting queries (KQL) can search and correlate data, but they don’t inherently provide rich visualization and external enrichment workflows. Azure Monitor is the underlying platform for logs/queries, but it’s not the Sentinel-native investigation experience for threat hunting and IoC enrichment. Microsoft Cloud App Security (Defender for Cloud Apps) is a CASB focused on SaaS app visibility and control, not Sentinel data visualization/enrichment. Exam tips: When you see “visualize,” “enrich,” “Jupyter,” “Python,” or “third-party threat intel/API,” think Sentinel Notebooks. When you see “search across logs with KQL,” think Hunting queries. When you see “automate response,” think Playbooks (Logic Apps), not listed here.
DRAG DROP - You are informed of a new common vulnerabilities and exposures (CVE) vulnerability that affects your environment. You need to use Microsoft Defender Security Center to request remediation from the team responsible for the affected systems if there is a documented active exploit available. Which three actions should you perform in sequence? To answer, move the appropriate actions from the list of actions to the answer area and arrange them in the correct order. Select and Place:
Select the correct answer(s) in the image below.
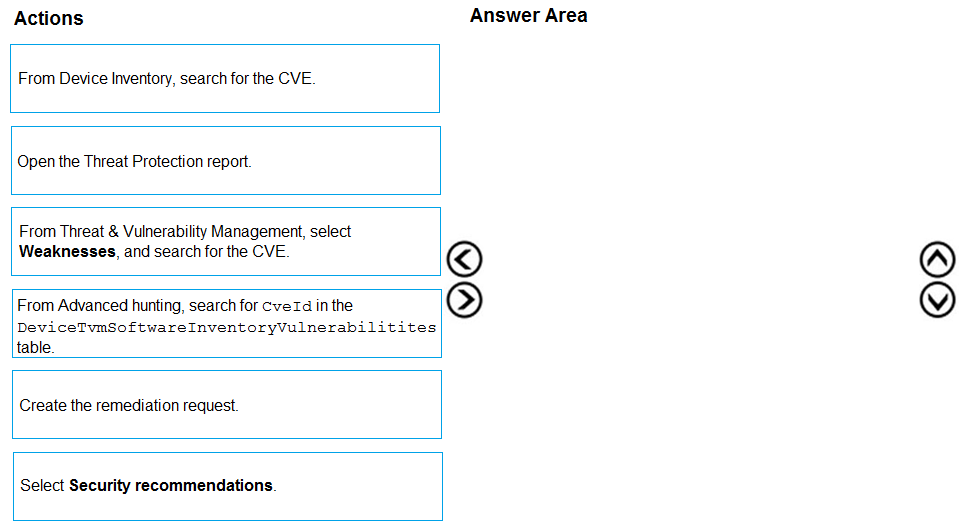
Pass is appropriate because the correct ordered actions are identifiable from Defender for Endpoint TVM workflows. Correct sequence (3 actions): 1) From Threat & Vulnerability Management, select Weaknesses, and search for the CVE. 2) Select Security recommendations. (From the CVE/weakness context, you pivot to the recommended remediation guidance and affected scope.) 3) Create the remediation request. Why this is correct: Weaknesses is the CVE-centric view used to locate and assess a specific CVE and see exploit availability/intelligence. Security recommendations is where Defender presents the actionable remediation guidance and where remediation flows are initiated. Creating the remediation request is the explicit step that sends/assigns remediation to the team responsible. Why others are wrong: Device inventory is primarily for device-centric views, not the standard CVE triage entry point. Threat Protection report is not the TVM remediation workflow. Advanced hunting can find affected assets via KQL, but it’s not the intended UI-driven process for requesting remediation in this scenario.
Note: This question is part of a series of questions that present the same scenario. Each question in the series contains a unique solution that might meet the stated goals. Some question sets might have more than one correct solution, while others might not have a correct solution. After you answer a question in this section, you will NOT be able to return to it. As a result, these questions will not appear in the review screen. You are configuring Microsoft Defender for Identity integration with Active Directory. From the Microsoft Defender for identity portal, you need to configure several accounts for attackers to exploit. Solution: From Azure AD Identity Protection, you configure the sign-in risk policy. Does this meet the goal?
Yes is incorrect because Azure AD Identity Protection and Microsoft Defender for Identity serve different purposes. Identity Protection applies risk-based controls to Microsoft Entra ID sign-ins, but it does not configure honeytoken-style or deceptive Active Directory accounts. Since the goal is specifically to configure accounts for attackers to exploit from the Defender for Identity portal, this solution does not meet the goal.
No is correct because configuring a sign-in risk policy in Azure AD Identity Protection does not create or manage accounts intended for attackers to exploit in Active Directory. Sign-in risk policies are designed to evaluate risky cloud authentication attempts and enforce actions such as MFA or password change. Microsoft Defender for Identity deception settings must be configured within MDI for relevant AD accounts, so the proposed solution does not satisfy the requirement.
Question Analysis
Core concept: This question is about Microsoft Defender for Identity (MDI) deception capabilities, specifically configuring accounts in Active Directory that attackers might try to use or exploit. In MDI, this is done by configuring honeytoken or sensitive accounts directly in the Defender for Identity settings, not through Microsoft Entra ID Identity Protection policies. Why correct: The proposed solution does not meet the goal because a sign-in risk policy in Azure AD Identity Protection is used to detect and respond to risky cloud authentication events. It does not create or configure deceptive Active Directory accounts for use by attackers, nor does it integrate with MDI's deception features. Therefore, the correct response is No. Key features: MDI supports deception by allowing administrators to mark specific on-premises Active Directory accounts as honeytokens or otherwise monitor them as high-value targets. These accounts are intended to trigger alerts if they are queried, authenticated, or used suspiciously. Azure AD Identity Protection, by contrast, evaluates user and sign-in risk in Microsoft Entra ID and applies conditional access-style remediation. Common misconceptions: A common mistake is confusing Microsoft Entra ID Identity Protection with Microsoft Defender for Identity because both deal with identity security. However, Identity Protection focuses on cloud identity risk and policy enforcement, while MDI focuses on on-premises Active Directory monitoring, lateral movement detection, and deception-related detections. Exam tips: For SC-200, distinguish between Microsoft Entra ID protections and Defender for Identity capabilities. If the task involves Active Directory reconnaissance, lateral movement, honeytokens, or attacker deception in AD, think Defender for Identity. If the task involves risky sign-ins, user risk, MFA, or password reset based on cloud identity risk, think Identity Protection.
You receive a security bulletin about a potential attack that uses an image file. You need to create an indicator of compromise (IoC) in Microsoft Defender for Endpoint to prevent the attack. Which indicator type should you use?
Incorrect. A URL/domain indicator with Action set to Alert only provides detection without prevention. The requirement is to prevent the attack, so “Alert only” does not meet the goal. Additionally, the prompt focuses on an image file artifact, which is better handled by a file-based indicator rather than only monitoring web destinations.
Not the best choice. URL/domain with Alert and block can prevent access to known malicious sites, but it blocks the delivery infrastructure, not the specific malicious image file. If the image can be delivered via email, removable media, or alternate domains/CDNs, a URL/domain block may not stop the attack. The question emphasizes an image file, pointing to a file hash IoC.
Correct. A file hash indicator with Action set to Alert and block is designed to prevent a known malicious file from being used on endpoints. Even if the file is an image, MDE can block the known-bad hash, providing both prevention and alerting. This is the most direct IoC type for a specific malicious file sample.
Usually incorrect here. Certificate indicators block files signed by a specific certificate (useful for compromised or malicious publishers). Most malicious image files are not signed, and even if they were, the question does not mention a signing certificate. File hash is the appropriate IoC when you have a specific malicious file to block.
Question Analysis
Core concept: This question tests Microsoft Defender for Endpoint (MDE) Indicators (Indicators of Compromise/Attack) and how to use them to prevent execution of known malicious content. In MDE, you can create indicators for different artifact types (file hash, URL/domain, IP address, certificate) and choose an action such as Alert only or Alert and block. Why the answer is correct: The bulletin describes a potential attack that uses an image file. To prevent the attack at the endpoint, you should block the malicious file itself. The most direct and commonly tested method is a file hash indicator with Action set to Alert and block. A file hash IoC targets the exact known-bad file (including an image such as .jpg/.png) and instructs MDE to block it when encountered (downloaded, written, or attempted to run/open depending on platform and enforcement). This aligns with “prevent” rather than merely “detect.” Key features and best practices: - File hash indicators support SHA-256 (preferred), and may also support SHA-1/MD5 depending on the portal experience; for exam purposes, assume SHA-256 is best practice. - “Alert and block” provides enforcement (prevention) and generates alerts for SOC visibility. - Use file hash IoCs when you have a specific known malicious sample; use URL/domain IoCs when the delivery infrastructure is known; use certificate IoCs when you need to block a signer across many files. - This maps to Azure Well-Architected Security pillar principles: reduce attack surface and implement preventive controls with monitoring. Common misconceptions: - Choosing URL/domain “Alert and block” can seem right because many attacks are delivered via web links, but the prompt specifically says the attack uses an image file; blocking the file hash is more precise and resilient if the file is delivered via multiple channels. - Certificate indicators are powerful but only apply when the malicious file is signed (or you want to block a compromised/abused certificate). Many malicious image files are unsigned. Exam tips: - If the question says “prevent” or “block,” pick an indicator type that supports blocking and matches the artifact described. - If the artifact is a specific file (including non-executables used for exploitation), choose file hash + Alert and block. - Use “Alert only” when you want visibility without enforcement (e.g., testing, potential false positives).
Other Practice Tests

Start Practicing Now
Download Cloud Pass and start practicing all Microsoft SC-200 exam questions.